
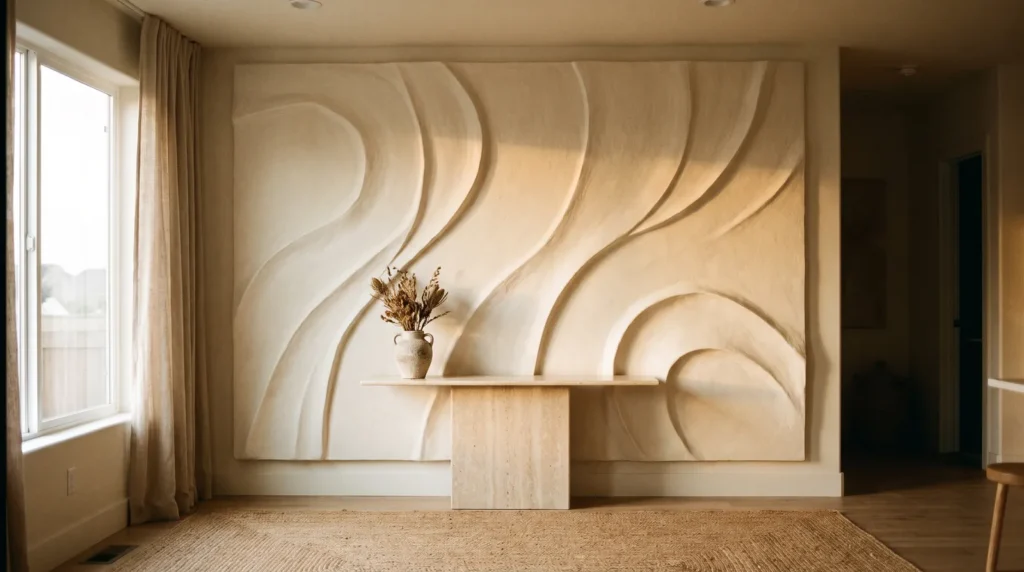
A large piece of plaster wall art can look like a high-end designer piece without a high-end price. Most of the materials are ordinary hardware and craft store supplies; the luxe effect comes from scale, a soft neutral palette and careful finishing.
This guide covers the foundations first, including which medium to use and what supplies you need, then shares seven luxe design ideas and a step-by-step method for making and hanging a large piece that lasts.
1. Choosing the Right Medium
The biggest beginner mistake is choosing the wrong materials. Plaster is heavy and canvas is flexible, and when a flexible surface shifts, a rigid material on top of it cracks.
If you want minimalist plaster canvas art that survives a move, the medium matters. You have three main options.
Joint Compound (Drywall Mud)
This is the cheapest option. It’s easy to find and easy to spread, but it dries very rigid, so it isn’t suited to a stretched canvas. Use it on a solid backing such as a wooden art panel or a piece of MDF.
Plaster of Paris
Plaster of Paris sets very quickly and dries rock hard. It’s great for casting shapes, but it doesn’t leave time for slow, careful texturing, so skip it for flat wall art.
Heavy Body Acrylic Modeling Paste
Modeling paste is made for art. It holds deep, sculptural peaks and dries with a little flexibility, so if you’re making diy textured plaster wall art on a traditional stretched canvas, it’s the best way to avoid spiderweb cracks. It costs a bit more, but it protects all your work.
2. The Supplies You’ll Need
Gather everything before you start, so it’s all within reach once the plaster is mixed.
- Your Base: A wooden panel for joint compound, or a stretched canvas for modeling paste.
- The Medium: Modeling paste or all-purpose joint compound.
- Gesso: A primer that helps the medium adhere to the surface.
- Application Tools: A wide putty knife, a notched trowel, and a few plastic palette knives.
- Matte Acrylic Sealer: Worth it for keeping the piece clean and protected for years.
- Heavy-Duty Hanging Hardware: French cleats are best for the added weight.

3. Luxe Plaster Wall Art Ideas for a Gallery Look
With your supplies ready, it’s time to choose a design. These seven ideas give a high-end look and work on any large canvas or panel.
The Classic Arch
A soft architectural shape that suits boho rooms. Use a wide putty knife to sweep a smooth rainbow shape across the center of the board, leaving the edges raw and textured.
The Zen Ripple
Inspired by a Japanese sand garden. Spread a thick, even layer of paste, then drag a notched adhesive trowel slowly from top to bottom in continuous, wavy lines.
Wabi-Sabi Raw Edge
Apply the plaster in thick, random patches and leave some areas of raw linen canvas showing. The rough, unfinished edges are what make this one beautiful.
Geometric Grid
For a structured, modern look, tape a grid onto your primed canvas with painter’s tape, spread plaster thickly over everything and peel the tape away while it’s still wet to reveal crisp lines.
Sculptural Petals
Using a small palette knife, press a dollop of thick modeling paste onto the canvas and pull away sharply to make a raised petal. Repeat to build an abstract cluster of flowers.
The Minimalist Sweep
Sometimes one mark is enough. Apply a thin base coat, then pull a single sweeping arc across the canvas with a large taping knife. The ridge it leaves catches the morning light beautifully.
Dual-Tone Layers
Mix a little beige or taupe acrylic paint into half of your plaster, then apply the white and tinted plaster in overlapping layers. It looks a bit like an aerial view of a desert landscape.

4. Step-by-Step: Crafting Your Large 3D Plaster Wall Art
This part is messy, so wear old clothes, cover your work surface and give yourself an afternoon.
Step One: Prime the Surface
Brush a layer of gesso over your canvas or wood panel so the plaster has something to grip, and let it dry completely.
Step Two: Mix Your Medium
If you want a specific color, now is the time to mix in a few drops of acrylic paint. Stir it gently. Whipping it too fast will introduce air bubbles, which can pop and leave tiny craters in your finished art.
Step Three: Apply the Base Layer
Use a wide putty knife to spread a thin, even layer of plaster over the whole surface as your background. It doesn’t need to be perfectly smooth; small imperfections add character.
Step Four: Build the Texture
Add more plaster to build your chosen design from the seven ideas above. Work in small sections, since the material starts to dry fairly quickly, and if something goes wrong, just scrape it off and try again.
Step Five: Let It Dry
Large 3D plaster wall art holds a lot of moisture, so let it dry flat for at least 48 hours. If you prop it against a wall while it’s wet, the heavy plaster can sag or slide. Keep it away from heat vents, because fast drying causes cracks.

5. Sealing and Dusting So It Lasts
It’s worth thinking about what happens after the art goes up. Plaster is very porous, so it attracts dust, pet hair and cooking grease, and wiping raw plaster with a damp cloth smears it.
Once the plaster is completely dry, seal it.
Wait until the piece is completely dry, then take it outside or to a well-ventilated room and spray two light coats of matte acrylic sealer. The matte finish keeps the raw, chalky look, and afterwards you can dust it easily with a soft microfiber cloth or a clean makeup brush.
6. Framing and Hanging Heavy Textured Art
Once the art is finished, the last step is hanging it properly.
A few pounds of plaster make a canvas much heavier, and a single nail with string won’t hold it safely. Use heavy-duty hardware.
Fit a French cleat to the back of your panel or the top stretcher bar of the canvas. It spreads the weight evenly across the wall and holds the art flat against it for a clean, gallery look.
For a polished finish, place the artwork in a wooden float frame. It leaves a small gap between the art and the frame, which shows off the thick texture around the edges and makes a DIY piece look like a boutique find.

Quick Answers
How long does large plaster wall art take to dry?
Thin layers usually dry overnight. Thick, sculpted texture can take 48 to 72 hours, depending on humidity. Let it dry flat in a cool room and avoid heaters or direct sun, which cause cracks.
Can I make luxe plaster art without expensive supplies?
Yes. Premixed joint compound, a rigid board or sturdy canvas, a putty knife and a matte sealer are enough for most of the ideas here. The high-end look comes from scale, calm color and good lighting more than from costly materials.
How heavy is large plaster wall art, and how do I hang it?
A large piece can easily weigh 15 to 20 pounds. Use D-rings and braided picture wire or a French cleat, and screw into a wall stud or use anchors rated well above the weight.
Final Thoughts
Making your own textured wall decor is very satisfying. You choose the size, the color and the texture to suit your room, and you get a high-end look without the high-end price.
Choose the right medium, take your time with the texture and hang it securely, and you’ll have a large plaster piece that looks far more expensive than it was. When friends ask where you bought it, you get to tell them you made it yourself.

