
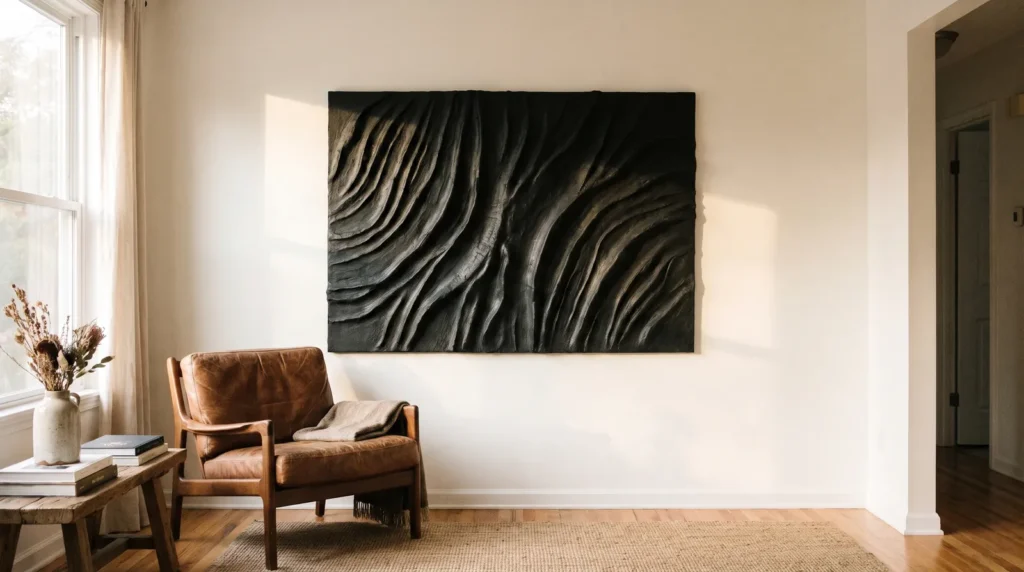
Black plaster wall art brings a mood that light neutrals can’t. Deep charcoal ridges soak up light, so every highlight and shadow looks more dramatic, especially next to warm wood, leather and soft white walls.
It’s also a very achievable weekend project once you know the tricks. The color goes into the paste rather than on top of it, the base needs to be rigid and sealed, and the finish has to stay completely matte. These 19 tips cover all of that, plus how to style and light the finished piece.
The Short Version
- Skip the canvas. Stretched fabric moves with humidity and cracks rigid plaster. A solid MDF or wood panel holds heavy texture much better.
- Tint rather than paint. Mixing black acrylic into wet modeling paste gives a rich, matte, stone-like depth that surface paint can’t match.
- Light it well. Black soaks up light, so light from a sconce or track fixture that skims across the surface is what shows off the ridges.
- Seal it. A completely flat varnish protects the art from dust while keeping that ultra-matte designer finish.
Your Weekend Plan
Here is a realistic way to fit a 3D black plaster project into a weekend. The making happens on Saturday and Sunday; the full cure takes a little longer, so plan to seal and hang it a few days later.
- Saturday morning: buy supplies, prime or seal your board, and let it dry for a couple of hours.
- Saturday afternoon: mix your compound or paste and apply the base layer. Keep it thin so it can dry overnight.
- Sunday: build your main texture with the trowel or palette knife, add any wash or color, then leave the piece flat to cure.
- Next few days: let thick areas dry fully, usually 48 to 72 hours, before sealing and hanging.
Building a Base That Won’t Crack
1. Swap Canvas for MDF
This is the most common beginner mistake. Stretched canvas is fabric, so it expands and contracts slightly as the temperature changes, and the rigid plaster on top cracks when it moves. A half-inch MDF board or birch panel from the hardware store gives heavy texture a solid base.
2. Seal the Wood Base
Wood is porous, so wet plaster applied straight onto raw MDF loses its moisture too quickly, shrinks and develops hairline cracks. Before anything else, paint the board with two coats of good acrylic gesso and let it dry completely.
3. Upgrade to Flexible Modeling Paste
Standard drywall joint compound is made for flat walls and gets brittle when it’s applied thickly. For deep, sweeping ridges, use a medium made for art, such as Liquitex Flexible Modeling Paste. Its acrylic binder lets the dried texture bend slightly instead of cracking.
4. Prime the Back of the Board
If you only put wet paste on the front of an MDF board, it can bow toward the wet side as it dries. A quick coat of primer or leftover house paint on the back balances the two sides and keeps the board flat.
Texture That Looks Expensive

5. Mix the Pigment Before Application
Painting dried plaster black often leaves a slightly shiny, plastic look. Instead, squeeze a heavy body acrylic in Carbon Black into the wet modeling paste and mix it thoroughly in a bucket. The color goes all the way through, so it looks like natural stone.
6. Add Pumice Gel for Grit
Wabi-sabi pieces rarely look perfectly smooth; they have a raw, earthy grit. Folding a few tablespoons of coarse pumice gel into the black paste gives the look of aged concrete or volcanic rock, and the texture catches the light beautifully.
7. The Trowel Pull Technique
Small paintbrushes won’t give you this look; you need masonry tools. Scoop a generous amount of black paste onto a metal Venetian plaster trowel, press it flat against the board and pull it downward with firm pressure, lifting the back edge slightly. This creates soft, sweeping valleys.
8. The Notched Comb Drag
For a more geometric look, use a notched tile adhesive trowel. Spread a thick, even layer of black plaster across the board, then drag the trowel through it in one continuous, sweeping arch. The deep, even grooves create lovely shadows.
9. Avoid the Frosting Look
Black textured art can end up looking like badly frosted chocolate cake, and that usually happens when the paste is overworked. Make broad, confident strokes and leave them alone, because too much smoothing flattens the sharp peaks that give the piece its character.
Curing and Sealing

10. Let It Cure Slowly
It’s tempting to hang it straight away, but keep hair dryers and heaters away from wet plaster. Fast drying shrinks the top while the bottom is still wet, which leads to cracks. Let it dry naturally in a cool, dry room for at least 48 hours.
11. Sand the Sharpest Peaks
Once it’s completely dry, run your hand gently over the surface. You may feel a few thin, needle-like peaks where the trowel lifted away; they’re fragile and can chip. Buff them lightly with 220-grit sandpaper.
12. Fix Micro-Cracks with a Syringe
Even with good preparation, a fine crack can appear in the thickest areas. Fill a plastic craft syringe with a mix of black acrylic paint and liquid acrylic medium and inject it gently into the crack. It bonds the edges together and the repair is almost invisible.
13. Apply a Dead Flat Varnish
Dust shows up easily on black, so seal the piece to make cleaning easier. Gloss spoils the moody look, so choose a good dead-flat acrylic varnish and brush it on in a very thin layer. It protects the plaster while keeping the surface completely matte.
14. The Dry Brush Highlight
If the dry piece feels a little flat, add some subtle dimension. Dip a stiff brush in dark charcoal gray paint, wipe almost all of it off on a paper towel and brush lightly over the highest ridges. It gives the look of naturally weathered stone.
Styling and Lighting

15. Light It From Above
Black soaks up light, so in a dim room heavily textured black art can just look like a dark patch. A wall sconce or ceiling track light above the art, angled straight down the face of the piece, skims light across the surface and fills the ridges with shadow.
16. Float Frame It in Walnut
Raw edges can look unfinished, so consider a float frame. It leaves a small gap of about a quarter inch between the art and the wood, which makes the heavy panel look as if it’s floating. Warm walnut is a lovely contrast to matte black plaster.
17. Pair with Warm Neutrals
On a dark gray wall, a large black textured piece can make a room feel closed in. Black looks best with a lighter background, so hang it on a warm white, cream or limewashed wall, where the contrast makes it the clear focal point.
18. Scale Up for Impact
Small black canvases can look like clutter, because this style works best at a generous size. Above a sofa or bed, aim for at least 36 by 48 inches. One large piece of minimalist 3D plaster decor looks far more expensive than a gallery wall of small frames.
19. Dust with a Makeup Brush
Textured art collects dust, but paper towels and microfiber cloths can snag on the sharp ridges and leave white lint on black art. A large, clean, fluffy makeup brush sweeps the dust out of the grooves without leaving anything behind.

Your Questions, Answered
Can I use drywall mud for canvas art?
It’s best avoided on stretched canvas. Dried drywall mud is rigid and brittle, and because canvas moves with temperature changes, the mud tends to crack and flake off. Use flexible acrylic modeling paste on canvas, or save drywall mud for rigid wood panels.
How long does plaster wall art take to dry?
The surface usually dries in 4 to 6 hours, but thick textured plaster takes 48 to 72 hours to dry all the way through, depending on humidity and depth. Let it dry slowly in the air to avoid cracks.
What is the best black paint for plaster?
Tinting the wet plaster with a heavy body acrylic such as Carbon Black works best. If you paint the surface after it dries, choose a good ultra-matte interior acrylic. Avoid eggshell or satin, because even a slight shine makes the texture look like plastic.
A black plaster piece is a very doable weekend project, and it adds a mood to a room that light neutrals can’t. Mix the color into the paste, keep the finish matte and light it from above, and it’ll look like a designer piece.

