
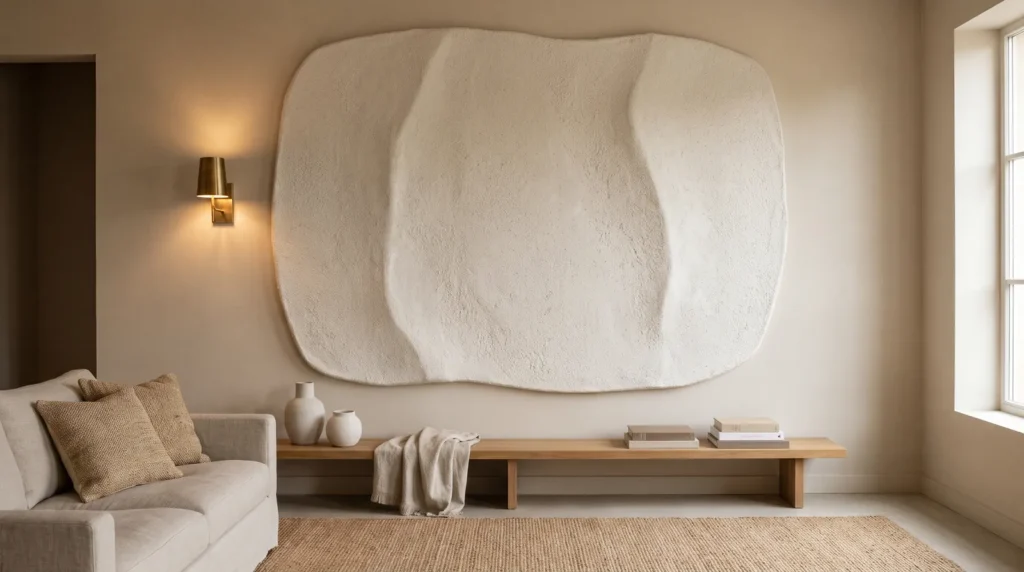
Blank walls can be hard to get right. You want a calm, finished room, but mass-produced prints can feel flat, and original designer pieces can cost as much as a month’s rent.
Textured plaster art sits nicely in between.
Using a few plaster wall art interior design ideas is one of the easiest ways to get a quiet, organic modern look. Plaster brings a tactile richness to a room without loud colors or busy patterns: the chalky, matte surface softens the light, and the imperfect ridges add a sense of movement.
Hanging the piece is only half the job, though. How you light, size and style it makes the difference, so here are five practical tips to help your textured art look its best.
1. Light It From the Side
Texture needs shadow to show up. Under flat overhead lighting, even a beautifully sculpted piece loses its depth and can look like a plain white square.
The trick is to light it from the side, a technique often called grazing. A light placed close to the art and aimed along the wall catches the high points of the plaster and casts long, soft shadows into the grooves, which is what makes minimalist white plaster art look expensive.
There are a few easy ways to do it.
A brass picture light mounted above the frame casts a warm downward glow that’s lovely on horizontal textures. A pair of wall sconces on either side brings out vertical ridges and adds a soft, moody glow in the evening. If you’d rather use daylight, hang the art on a wall at right angles to a large window, so the morning sun skims across it.

2. Match the Material to Your Style
The material you choose changes the feel of the piece, so match it to your style.
If you love Japandi or wabi-sabi style, choose materials that celebrate imperfection. Joint compound is thick and heavy, and a few very fine surface lines can appear as it dries. In this style, a little of that natural, aged character is welcome, as long as the base is rigid so the cracks stay tiny.
For a sleeker modern look, use modeling paste or heavy body acrylic mediums instead. They hold crisp, geometric peaks without cracking and dry to a bright, clean white rather than an earthy off-white.
Venetian plaster is another lovely option. It contains real marble dust, and when it’s applied to a board and polished, it gives a smooth surface with a soft, cloud-like depth. It’s cool to the touch and looks especially good above a bouclé sofa or a warm wood credenza.
3. Get the Scale Right
Scale is where a lot of styling goes wrong. A small piece on a large, empty wall tends to look lost.
When you’re choosing large 3D plaster wall art, think bigger than you might expect. Above a sofa, the art should span about two-thirds of the sofa’s width.
Don’t be afraid of very large pieces. A tall textured panel leaned against a bedroom wall gives a relaxed boutique-hotel feel. If you can’t find a single canvas large enough, try a diptych or triptych: two or three textured panels hung side by side about two inches apart look cohesive and deliberate.

4. Decide Whether to DIY or Buy
There are two easy ways to get the look: make it yourself or buy from an independent artist.
Making it yourself is very rewarding. A large blank canvas, a bucket of joint compound and a few trowels from the hardware store usually cost under fifty dollars, and you can shape the arches or lines to suit your room. It’s messy but relaxing; you just need a drop cloth and some patience while the thick layers dry over a few days.
Both routes are good options; it just depends on how much time you have.
DIY pieces don’t always come out the way you hoped, so if you’d like a polished result without the effort, consider commissioning one. Many artists on Etsy and in independent galleries specialize in plaster work, using quality materials and oak floating frames. A floating frame leaves a small gap between the canvas and the wood, so the plaster looks as if it’s hovering, and it’s an easy way to make any piece look more finished.

5. Keep the Raw Finish Clean
Once your textured piece is on the wall, you’ll eventually notice dust settling into the grooves.
Textured surfaces collect household dust, and because plaster art depends on its raw, matte finish, it needs a gentle touch. A damp cloth can soften unsealed joint compound and blur the ridges.
Use a soft, dry brush instead, such as a clean makeup brush or a good paintbrush, and sweep the dust out of the grooves about once a month. For heavier buildup, a can of compressed air blows it out without touching the surface.
If you made the art yourself, you may want to seal it with a clear topcoat. Choose carefully, because many varnishes labeled matte still leave a slight sheen that flattens the look of the texture. An ultra-flat spray fixative, like the kind charcoal artists use, is the safest option.

Frequently Asked Questions About Plaster Art
Is plaster wall art heavy?
It can be, depending on the materials. A large canvas coated in thick joint compound needs heavy-duty wall anchors, so weigh the finished piece and choose hardware rated for it rather than relying on a simple nail.
Does joint compound crack on canvas?
It often does, because canvas flexes and joint compound is rigid. Reinforce the back of the canvas with stiff cardboard, or use a solid wood panel instead of a stretched canvas.
Can you paint over textured wall art?
Yes. The raw, creamy white look is popular, but you can paint over the dried texture too. Earthy tones like olive green, terracotta or soft charcoal look beautiful over deep ridges. Use a good matte interior paint to keep the chalky look.
With the right material, the right size and good side lighting, a textured plaster piece can change the whole feel of a room.
Start with the wall you look at most, and build from there.

